Securing a Web Application with OAuth2/OpenID Connect
Table of Contents
You will learn how to build and secure a simple web application with Vert.x, OAuth2 and OpenID Connect.
What you will build
In the first part of the how-to, you will build a secure web application that will use GitHub to authenticate any application user. We will then continue exploring the API and use OpenID Connect to auto discover the security related configuration of the application.
What you need
-
A text editor or IDE
-
Java 11 or higher
-
A GitHub account
Create a Project
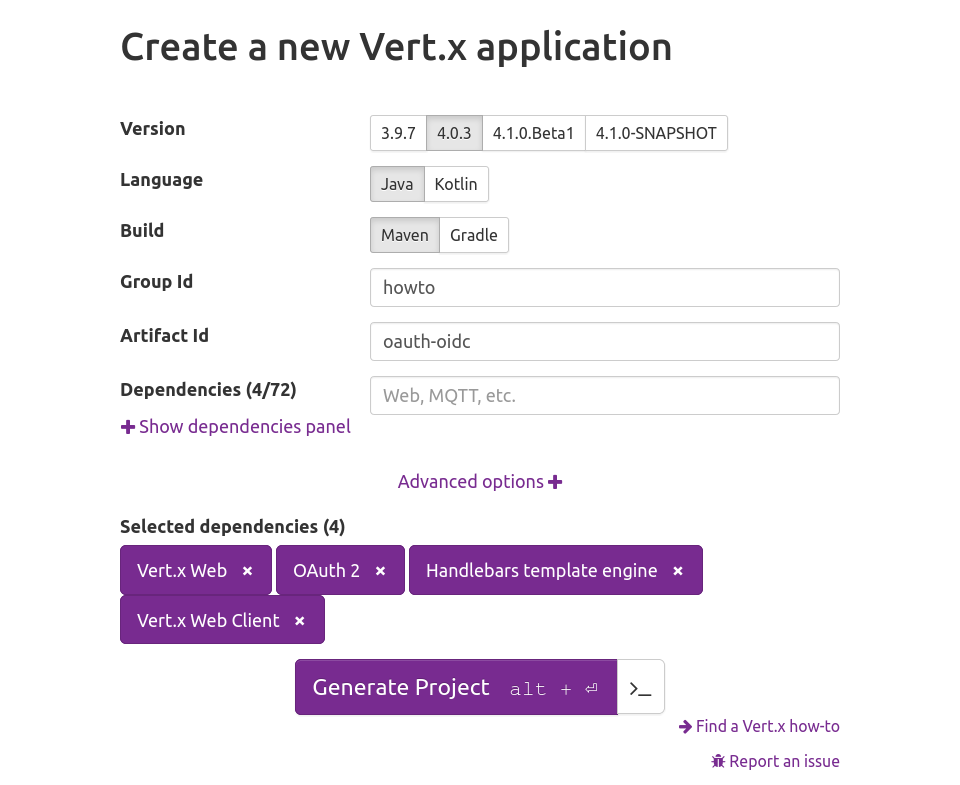
Go to start.vertx.io and create a project with the following dependencies:
-
Vert.x Web
-
OAuth2
-
Handlebars template engine
-
Vert.x Web Client
Basics of Authentication
In this section, we’re going to focus on the basics of authentication. Specifically, we’re going to create a Java server that implements GitHub’s web application flow.
Registering your app
First, you’ll need to register your application. Every registered OAuth2 application is assigned a unique Client ID and Client Secret. The Client Secret should NOT be shared! That includes checking the string into your repository.
You can fill out every piece of information however you like, except the Authorization callback URL. This is easily the most important piece to setting up your application. It’s the callback URL that GitHub returns the user to after successful authentication.
Since we’re running a regular Vert.x Web server, the location of the local instance is set to http://localhost:8080.
Let’s fill in the callback URL as http://localhost:8080/callback.
Accepting user authorization
Now, let’s start filling out our simple server.
Open the class howto.oauth_oidc.MainVerticle and paste this into it:
package howto.oauth_oidc;

import io.vertx.core.Future;
import io.vertx.core.VerticleBase;
import io.vertx.ext.auth.oauth2.OAuth2Auth;
import io.vertx.ext.auth.oauth2.providers.GithubAuth;
import io.vertx.ext.web.Router;
import io.vertx.ext.web.handler.OAuth2AuthHandler;
import io.vertx.ext.web.templ.handlebars.HandlebarsTemplateEngine;

public class MainVerticle extends VerticleBase {

  private static final String CLIENT_ID =
    System.getenv("GITHUB_CLIENT_ID");
  private static final String CLIENT_SECRET =
    System.getenv("GITHUB_CLIENT_SECRET");  // (1)

  @Override
  public Future<?> start() {

    HandlebarsTemplateEngine engine =
      HandlebarsTemplateEngine.create(vertx);     // (2)

    Router router = Router.router(vertx);         // (3)

    router.get("/")                               // (4)
      .handler(ctx -> {
        // we pass the client id to the template
        ctx.put("client_id", CLIENT_ID);
        // and now delegate to the engine to render it.
        engine.render(ctx.data(), "views/index.hbs")
          .onSuccess(buffer -> {
            ctx.response()
              .putHeader("Content-Type", "text/html")
              .end(buffer);
          })
          .onFailure(ctx::fail);
      });

    OAuth2Auth authProvider = GithubAuth.create(vertx, CLIENT_ID, CLIENT_SECRET);

    router.get("/protected")                      // (5)
      .handler(
        OAuth2AuthHandler.create(vertx, authProvider, "http://localhost:8080/callback")   // (6)
          .setupCallback(router.route("/callback"))
          .withScope("user:email"))               // (7)
      .handler(ctx -> {
        ctx.response()
          .end("Hello protected!");
      });

    return vertx.createHttpServer()                      // (8)
      .requestHandler(router)
      .listen(Integer.getInteger("port", 8080))
      .onSuccess(server -> System.out.println("HTTP server started on port: " + server.actualPort()));
  }
}-
We will read the secrets as environment variables
-
In order to use a handlebars we first need to create an engine
-
To simplify the development of the web components we use a
Routerto route all HTTP requests to organize our code in a reusable way. -
Entry point to the application, this will render a custom template.
-
The protected resource (not really protected yet)
-
We now configure the OAuth2 handler, it will set up the callback handler (as defined in GitHub Application panel)
-
For this resource we require that users have the authority to retrieve the user emails
-
Start up the server
Your client ID and client secret keys come from your application’s configuration page. You should NEVER, EVER store these values in your git repository — or any other public place, for that matter. We recommend storing them as environment variables — which is exactly what we’ve done here.
Notice that the protected resource uses the scope user:email to define the scopes requested by the application.
For our application, we’re requesting user:email scope for reading private email addresses later in the how-to.
Next, in the project resources create the template views/index.hbs and paste this content:
<html lang="en">
<body>
<p>
  Well, hello there!
</p>
<p>
  We're going to the protected resource, if there is no
  user in the session we will talk to the GitHub API. Ready?
  <a href="/protected">Click here</a> to begin!
</p>
<p>
  <b>If that link doesn't work</b>, remember to provide
  your own <a href="https://github.com/settings/applications/new">
  Client ID</a>!
</p>
</body>
</html>
(If you’re unfamiliar with how Handlebars works, we recommend reading the Handlebars guide.)
Navigate your browser to http://localhost:8080. After clicking on the link, you should be taken to GitHub, and presented with a dialog that looks something like this:

After a successful app authentication, GitHub provides a temporary code value.
This code is then posted back to GitHub in exchange for an access_token which is in turn translated to a User instance in your Vert.x application.
All this is taken care for you by the handler.
Checking granted scopes
Before the User object is handled to you, if your handler was configured with authorities they will be first checked.
If they are not present then the whole process is aborted with an Authorization (403) error.
However, you might want to assert for other granted authorities, in this case you would add an intermediate handler such as:
AuthorizationHandler.create(
  PermissionBasedAuthorization      // (1)
    .create("user:email"))          // (2)
.addAuthorizationProvider(ScopeAuthorization.create(" "))) // (3)-
Create a kind of authorization, in this case it’s a Permission
-
The
permissionwe want to assert -
The
providerobject will extract the right data from the user and perform the assertion
Case the assertion fails, the router will stop executing and return a Forbidden error.
Making authenticated requests
At this moment your application is already secure, and you can execute handlers knowing that the users are real GitHub users.
You can now execute API calls on behalf of the user.
For example, we could update the protected resource to print out the user registered email addresses, and some basic profile information from the userInfo end point.
package howto.oauth_oidc;

import io.vertx.core.Handler;
import io.vertx.ext.auth.authentication.TokenCredentials;
import io.vertx.ext.auth.oauth2.OAuth2Auth;
import io.vertx.ext.web.RoutingContext;
import io.vertx.ext.web.client.WebClient;
import io.vertx.ext.web.codec.BodyCodec;
import io.vertx.ext.web.templ.handlebars.HandlebarsTemplateEngine;

class ProtectedProfileHandler implements Handler<RoutingContext> {

  private final OAuth2Auth authProvider;
  private final HandlebarsTemplateEngine engine;

  ProtectedProfileHandler(OAuth2Auth authProvider, HandlebarsTemplateEngine engine) {
    this.authProvider = authProvider;
    this.engine = engine;
  }

  @Override
  public void handle(RoutingContext ctx) {
    authProvider
      .userInfo(ctx.user().get())       // (1)
      .onFailure(err -> {
        ctx.session().destroy();
        ctx.fail(err);
      })
      .onSuccess(userInfo -> {
        // fetch the user emails from the github API
        WebClient.create(ctx.vertx())
          .getAbs("https://api.github.com/user/emails")
          .authentication(new TokenCredentials(ctx.user().get().<String>get("access_token"))) // (2)
          .as(BodyCodec.jsonArray())
          .send()
          .onFailure(err -> {
            ctx.session().destroy();
            ctx.fail(err);
          })
          .onSuccess(res -> {
            userInfo.put("private_emails", res.body());
            // we pass the client info to the template
            ctx.put("userInfo", userInfo);
            // and now delegate to the engine to render it.
            engine.render(ctx.data(), "views/protected.hbs")
              .onSuccess(buffer -> {
                ctx.response()
                  .putHeader("Content-Type", "text/html")
                  .end(buffer);
              })
              .onFailure(ctx::fail);
          });
      });
  }
}-
Get the user information from the OAuth2 userInfo endpoint
-
Make an API call on user behalf (using their access token)
We can do whatever we want with our results. In this case, we’ll just dump them straight into protected.hbs:
<html lang="en">
<body>
<p>Well, well, well, {{userInfo.login}}!</p>
<p>
  {{#if userInfo.email}} It looks like your public email
    address is {{userInfo.email}}.
  {{else}} It looks like you don't have a public email.
    That's cool.
  {{/if}}
</p>
<p>
  {{#if userInfo.private_emails}}
    With your permission, we were also able to dig up your
    private email addresses:
    {{#each userInfo.private_emails}}
      {{email}}{{#unless @last}},{{/unless}}
    {{/each}}
  {{else}}
    Also, you're a bit secretive about your private email
    addresses.
  {{/if}}
</p>
</body>
</html>
And you should get a simple screen like this:

Implementing "persistent" authentication
It’d be a pretty bad model if we required users to log into the app every single time they needed to access the web page. For example, try navigating directly to http://localhost:8080/protected. You’ll get an authentication request over and over.
What if we could circumvent the entire "click here" process, and just remember that, as long as the user’s logged into GitHub, they should be able to access this application? Hold on to your hat, because that’s exactly what we’re going to do.
Our little server above is rather simple. In order to wedge in some intelligent authentication, we’re going to switch over to using sessions for storing tokens. This will make authentication transparent to the user.
This can be achieved with the stock handlers, so our server file would be:
  @Override
  public Future<?> start() {

    HandlebarsTemplateEngine engine =
      HandlebarsTemplateEngine.create(vertx);

    Router router = Router.router(vertx);

    router.route()
      .handler(SessionHandler
        .create(LocalSessionStore.create(vertx)));  // (1)

    router.get("/")
      .handler(ctx -> {
        // we pass the client id to the template
        ctx.put("client_id", CLIENT_ID);
        // and now delegate to the engine to render it.
        engine.render(ctx.data(), "views/index.hbs")
          .onSuccess(buffer -> {
            ctx.response()
              .putHeader("Content-Type", "text/html")
              .end(buffer);
          })
          .onFailure(ctx::fail);
      });

// ...-
A session handler using in memory storage will now be able to keep track of active users, and you will not need to re-login on each request.
Why persistence is important?
While it may sound better to keep no state on the server, persistence has some benefits over stateless.
When a session is available, your application will be safer.
The reason is that OAuth2 uses nonce/state values during calls that can only be properly validated when a session is in place.
With a session we ensure that nonce values are unique and not reusable so your application is protected against replay attacks.
A second layer of optional protection is the use of Proof Key for Code Exchange. PKCE adds another layer of security to the exchanges between your application and the OAuth2 server to enable it you only need to configure your handler as:
OAuth2AuthHandler.create(vertx, authProvider)
  .setupCallback(router.route("/callback"))
  .withScope("user:email")
.pkceVerifierLength(64); // (1)-
By specifying a length between 64 and 128 PKCE will be enabled
OpenID Connect
Until this moment, we have been covering, plain OAuth2.
Vert.x also allows you to use OpenID Connect.
In a nutshell, OpenID Connect is a simple identity layer on top of the OAuth 2.0 protocol. The main differences are that tokens, are not opaque strings, but encoded in JSON Web Token format. This allows applications to have more fine-grained control on permissions/roles and reduce the number of round-trips to the IdP server. This also means that you will need to know much more information at front to start the application. For example, a few extra HTTP endpoints, security keys, etc…
Albeit this looking more complex, OpenID, defines a discovery API, which simplifies the setup to just a few lines of code. Instead of having you to know all the properties you can just (for example) discover the configuration if you’re using keycloak:
package howto.oauth_oidc;

import io.vertx.core.AbstractVerticle;
import io.vertx.core.Promise;
import io.vertx.ext.auth.oauth2.OAuth2Options;
import io.vertx.ext.auth.oauth2.providers.KeycloakAuth;

public class KeycloakDiscoverVerticle extends AbstractVerticle {

  private static final String CLIENT_ID =
    System.getenv("KEYCLOAK_CLIENT_ID");
  private static final String CLIENT_SECRET =
    System.getenv("KEYCLOAK_CLIENT_SECRET");

  @Override
  public void start(Promise<Void> startPromise) {
    OAuth2Options options = new OAuth2Options()
      .setClientId(CLIENT_ID)
      .setClientSecret(CLIENT_SECRET)
      .setTenant("vertx-test")          // (1)
      .setSite("https://your.keycloak.instance/auth/realms/{tenant}"); // (2)

    KeycloakAuth
      .discover(vertx, options)
      .onFailure(startPromise::fail)
      .onSuccess(authProvider -> {
        // use the authProvider like before to
        // protect your application
      });
  }
}-
Keycloak can host multiple applications so we can specify a tenant name
-
Keycloak server URL
The discovery process will perform the configuration of all known HTTP endpoints, and load security keys used to validated tokens.
Once ready an instance of OAuth2Auth is returned like before.
It is important here that you did not have to load and configure all this manually.
Discovery is a standard so you can use it with other services (that support it), for example (in no particular order):
-
Microsoft Azure
-
Google Cloud
-
Salesforce
-
Amazon Incognito
-
etc…
Summary
In this how-to we covered:
-
Creating a web project
-
Secure a web application with OAuth2
-
Invoke secure APIs with WebClient and OAuth2
-
Persist user session data
-
Use OpenID Connect
I hope you now can use OAuth2 on your next project!
Last published: 2025-02-09 00:42:27 +0000.